BA765 "Henry" Connection Test

How to program and use the cable testing system
There are two ways to program a cable tester.
1. Enter the spec manually.
2. Learn from a golden sample.
Learning from a sample is the choice for most companies as it is very quick. Here is an example of a simple cable to demonstrate how it works.
Learning a New Cable
1. Plug in a good harness, loom or cable.
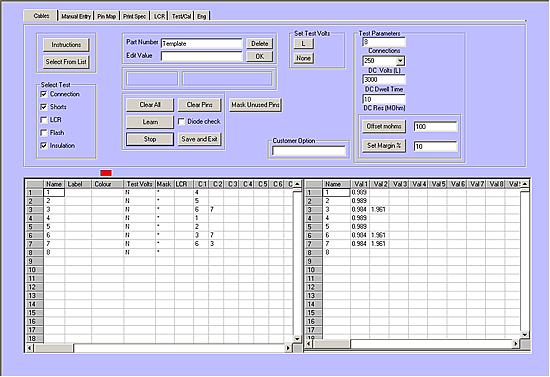
2. Enter the maximum number of pins to be learnt. ( Test parameters = 8 in the example below).
3. Click “Clear all” and then Click “Learn”. The system will then search for all connections and when it finds them it will measure the resistance and add it to the table.
In the example the first connection found is between pins 1 and 4, the resistance is 0.989 Ohms. The next connection is between pins 2 and 5, the resistance is 0.909 Ohms. Pin 3 is connected to two pins, pin 6 (resistance 0.984 Ohms) and pin 7 (1.961 Ohms)

You can now add a margin to allow for variations in the value between different cables. This can either be entered as a percentage “Set Margin %” e.g. 10% from the learned value, or as a fixed variation “offset mOhms” e.g. 100milliOhms.
If the specification calls for a maximum resistance then you can enter it instead of the learned value.
Testing components.
If there is a passive component such as a capacitor attached to the cable then you can test this with the optional LCR.

This can learn automatically, but for small numbers of components it is easy to use this method. Enter the two points connected to the capacitor (7 and 8) and click “Measure”. The value is measured and can then be copied to the table “Copy to Grid”. In this example a tolerance of 25% has been added to the capacitance test.
Automatically label the pins.
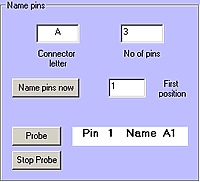
The pin name is initially set as the number of the tester connection but this can easily be changed to the actual pin name. In this example the first connector is called connector A and has 3 pins. Click “Probe” and then touch the pins in order with the probe supplied.

The grid is then automatically labelled with pin names. A1, A2, A3. This was then repeated for connectors B and C.

Saving the test
Enter the Part Number in the box (Demo1). Modify settings for insulation test voltage, test time and insulation threshold if required then click Save and Exit.

The system will now returns to the start screen with the new product added to the list of available products to test.

To move to the test screen you click “Start Test”.
Testing a cable
A test is begun by clicking “Full test” or by pushing the footswitch. The overall result is shown at the top of the screen as green “PASS” or red “FAIL”.
The details of each test are shown in the columns below.
Cont: The continuity test shows “Pass” if the resistance of this row is within the spec. The actual resistance value is shown on the other side of the cable.
Shorts: The shorts test shows Pass providing the line is not shorted to any other lines.
Ins: The insulation test will pass providing the insulation of the line is greater than the specification.
LCR: The LCR test will pass if the value measure by the LCR circuits lies within the tolerance specified.

All of the results on the screen are automatically stored in an Access database. Extra items can be added to allow important production information to be stored. These include Part Number, Serial Number (this can be automatically incremented after each Pass), Batch Number/Order Number and tester name. There is a facility to add up to 7 extra items to the screen. These can be stored in the database and also passed to a test certificate or label.
Printing Labels
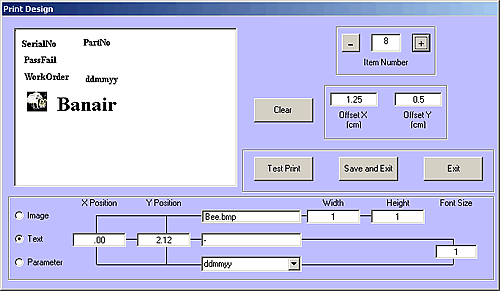
The tester can print to any windows compatible label printer. This allows a very flexible choice of label layout and material. The label can include the following items.
Images: These would typically be your company logo but they can also include other important customer information such as a ce mark or other symbol indicating compliance with standards.
Fixed text: This can include the company name, address and other information that remains constant on all labels.
Parameter: This feature imports data from a particular test. This can include Serial Number, Part Number, PASS/FAIL, Batch Number, Order Number, RMA Number, Date, Time, operator name or any one of the programmable items.
All the above text items can also be shown as a 3of9 Barcode. The label can be designed onscreen using the label designer included with the program. The designer also allows the position of the image on the paper to be finely adjusted and then tested, this can be difficult using the standard windows print screens.

Printing Certificates
The system has a very flexible certificate-printing engine. Design your certificate in Microsoft word using any images or formatting required by your customer. The certificate is then made ready for the BA765 system by simply adding placeholders to indicate where you want the results or other parameters to appear. This can include Serial Number, Part Number, PASS/FAIL, Batch Number, Order Number, RMA Number, Date, Time, operator name or any one of the programmable items.